CentOS7下FastDFS安装及配置(单节点)

一、前言
本文中使用本地VM虚机部署测试。
OS:CentOS Linux release 7.8.2003 (Core) 3.10.0-1160.15.2.el7.x86_64
IP:192.168.168.100
外部Nginx服务器IP:192.168.168.103
虚机配置:2核CPU、4G内存
防火墙设置:CentOS 7.8默认使用firewall,本文中禁用firewall,使用iptables。
软件说明:
软件 | 版本号 | 安装路径 |
fastdfs | 6.07 | 默认路径 |
libfastcommon | 1.0.49 | 默认路径 |
fastdfs-nginx-module | 1.22 | /usr/local/nginx-mod/fastdfs-nginx-module-1.22 |
nginx | 1.20.0 | /usr/local/nginx |
目录说明:
目录 | 用途 |
/data/tools | 存放软件源码安装包 |
/data/fastdfs/ | FastDFS数据存储位置(包含数据data和日志logs) |
二、基础环境
1.安装依赖
yum -y install gcc gcc-c++ libevent libevent-devel zlib zlib-devel pcre-devel perl
2.安装libfatscommon函数库
libfastcommon是FastDFS官方提供的,libfastcommon包含了FastDFS运行所需要的一些基础库。
下载地址:https://github.com/happyfish100/libfastcommon/releases
根据需求选择合适的版本进行下载安装。本文中使用的是最新稳定版本。
①安装方式一
cd /data/tools
wget -O libfastcommon-1.0.49.tar.gz https://github.com/happyfish100/libfastcommon/archive/V1.0.49.tar.gz
tar xf libfastcommon-1.0.49.tar.gz
cd libfastcommon-1.0.49/
./make.sh
./make.sh install
②安装方式二
yum -y install git
cd /data/tools
git clone https://github.com/happyfish100/libfastcommon.git
cd libfastcommon
git checkout V1.0.49
./make.sh clean
./make.sh
./make.sh install
三、安装FastDFS
1.安装
下载地址:https://github.com/happyfish100/fastdfs/releases
根据需求选择合适的版本进行下载安装。本文中使用的是最新稳定版本。
cd /data/tools
wget -O fastdfs-6.07.tar.gz https://github.com/happyfish100/fastdfs/archive/V6.07.tar.gz
tar xf fastdfs-6.07.tar.gz
cd fastdfs-6.07
./make.sh
./make.sh install
2.相关文件和目录
默认安装方式安装后的相应文件与目录
描述 | 目录 |
服务脚本 | /etc/init.d/fdfs_storaged /etc/init.d/fdfs_trackerd |
样例配置文件 | /etc/fdfs/client.conf.sample /etc/fdfs/storage.conf.sample /etc/fdfs/tracker.conf.sample |
命令工具 | /usr/bin/fdfs_appender_test | fdfs_appender_test1 | fdfs_append_file | fdfs_crc32 | fdfs_delete_file | fdfs_download_file | fdfs_file_info | fdfs_monitor | fdfs_regenerate_filename | fdfs_storaged | fdfs_test | fdfs_test1 | fdfs_trackerd | fdfs_upload_appender | fdfs_upload_file |
四、配置FastDFS
1.跟踪器(Tracker)
①创建tracker基础数据目录
mkdir -p /data/fastdfs/tracker
②进入/etc/fdfs,复制 FastDFS 跟踪器样例配置文件 tracker.conf.sample,并重命名为 tracker.conf
cd /etc/fdfs
cp tracker.conf.sample tracker.conf
③编辑tracker.conf
vi /etc/fdfs/tracker.conf
//修改如下配置项
# Tracker服务的端口(默认22122,一般不修改)
port = 22122
# Tracker服务数据和日志目录地址(根目录必须存在,子目录会自动创建)
base_path = /data/fastdfs/tracker
# HTTP 服务端口 默认8080,可根据需求修改
http.server_port = 8180
注:①上述配置项的修改仅供参考,实际环境中请根据需求修改调整。
②若tracker和storage部署在不同服务器,或外部调用程序在不同服务器,则需放开端口。
④启动Tracker
## 首次启动必须使用下列命令启动。后续可使用systemctl管理

/etc/init.d/fdfs_trackerd start
⑤服务检查
## 查看 FastDFS Tracker 是否已成功启动 ,如下图所示则成功
systemctl status fdfs_trackerd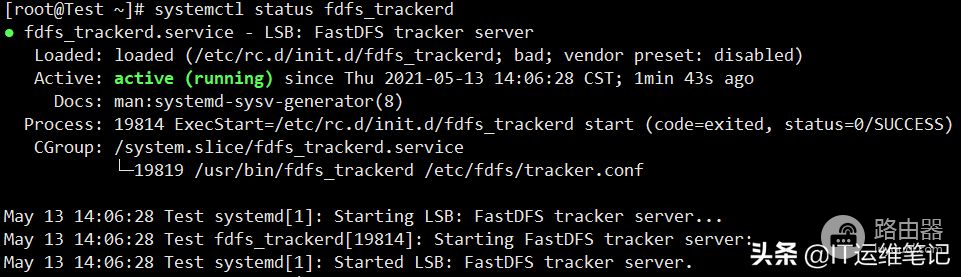
## 端口监听
netstat -tulnp|grep fdfs
⑥Tracker Server 目录及文件结构
Tracker服务启动成功后,会在base_path(本文中目录为:/data/fastdfs/tracker )下创建data、logs两个目录。目录结构如下:
ls -al /data/fastdfs/tracker  或   ll /data/fastdfs/tracker
//目录结构如下
|__data
| |__fdfs_trackerd.pid
| |__storage_changelog.dat
|__logs
| |__trackerd.log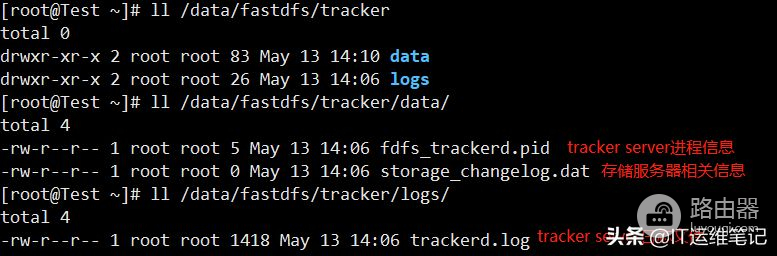
⑦服务管理
启动:/etc/init.d/fdfs_trackerd start 或 systemctl start fdfs_trackerd.service
关闭:/etc/init.d/fdfs_trackerd stop 或 systemctl stop fdfs_trackerd.service
重启:/etc/init.d/fdfs_trackerd restart 或 systemctl restart fdfs_trackerd.service
开机启动:chkconfig fdfs_trackerd on
查看状态:/etc/init.d/fdfs_trackerd status 或 systemctl status fdfs_trackerd.service
2.存储(Storage)
①创建Storage数据和日志目录
mkdir -p /data/fastdfs/storage
②进入 /etc/fdfs 目录,复制 FastDFS 存储器样例配置文件 storage.conf.sample,并重命名为 storage.conf
cd /etc/fdfs
cp storage.conf.sample storage.conf
③编辑storage.conf
vi /etc/fdfs/storage.conf
//修改如下配置项
# 指定此storage server所在组(卷)
group_name = group1
# storage服务端口(默认23000,一般不修改)
port = 23000
# storage的工作空间(数据和日志文件存储根目录)
base_path = /data/fastdfs/storage
# storage的存储空间,如果不配置,则为 base_path 的值(有多个存储路径时,每个存储路径写一行,第一个为0,第二个为1,以此类推)
store_path0 = /data/fastdfs/storage
# Tracker服务器的地址和端口号,用于心跳(有多个tracker server时,每个tracker server写一行)
tracker_server = 192.168.168.102:22122
# http访问文件的端口(默认8888,看情况修改,和nginx中保持一致)
http.server_port = 8888
注:①上述配置项的修改仅供参考,实际环境中请根据需求修改调整。
②关于 store_path 项的配置,官方不推荐其配置值跟 base_path 项值一样,建议使用不同目录路径。本文为测试,所配置的值为一样。
④启动Storage
systemctl start fdfs_storaged
注:若tracker和storage部署在不同服务器,首次启动Storage必须使用 /etc/init.d/fdfs_storaged start 命令启动。本文中tracker和storage部署在同一服务器,在tracker服务器已启动的情况下,首次可使用systemctl来启动storage服务。
⑤服务检查
## 查看 Storage 是否成功启动,23000 端口是否被监听
systemctl status fdfs_storaged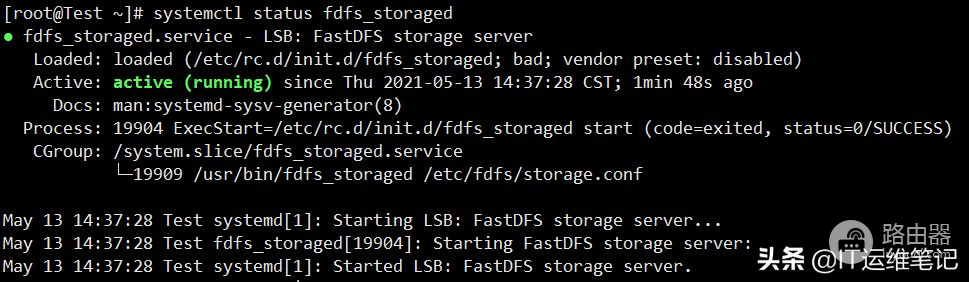
## 查看服务端口23000是否被监听
netstat -unltp | grep fdfs
## 查看Storage和Tracker是否在通信(ACTIVE表示正常)
/usr/bin/fdfs_monitor /etc/fdfs/storage.conf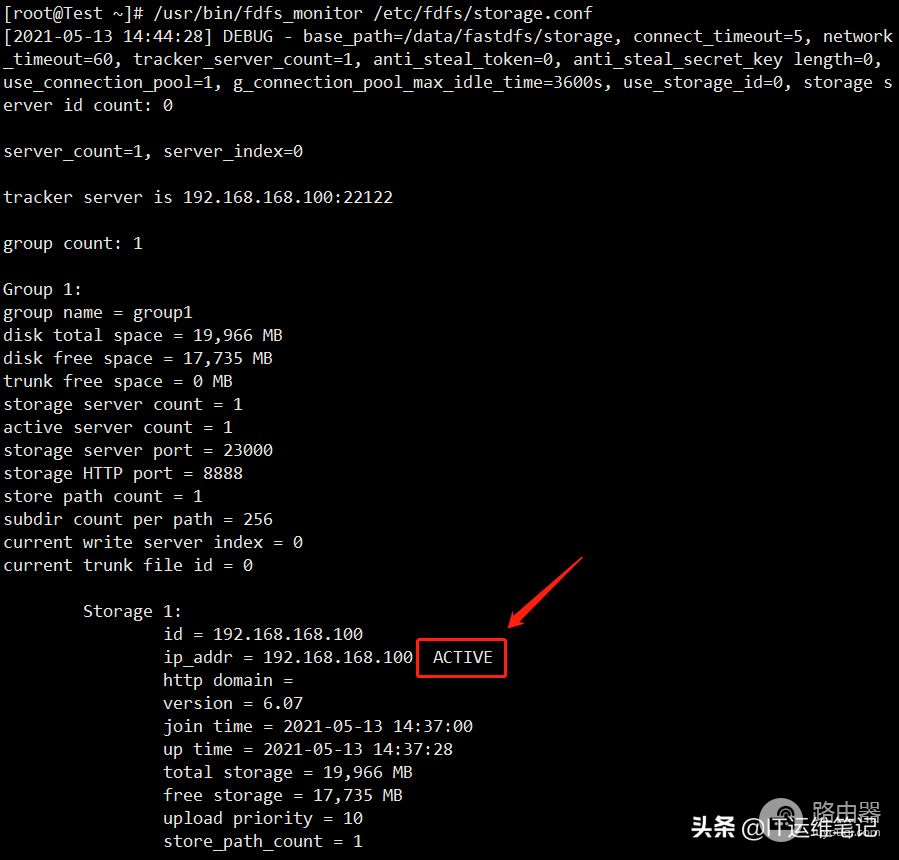
⑥服务管理
启动:/etc/init.d/fdfs_storaged start 或 systemctl start fdfs_storaged.service
关闭:/etc/init.d/fdfs_storaged stop 或 systemctl stop fdfs_storaged.service
重启:/etc/init.d/fdfs_storaged restart 或 systemctl restart fdfs_storaged.service
开机启动:chkconfig fdfs_storaged on
查看状态:/etc/init.d/fdfs_storaged status 或 systemctl status fdfs_storaged.service
3.客户端(client)
①创建client数据和日志目录
mkdir -p /data/fastdfs/client
②进入 /etc/fdfs 目录,复制 FastDFS 客户端样例配置文件 client.conf.sample,并重命名为 client.conf
cd /etc/fdfs
cp client.conf.sample client.conf
③编辑client.conf
vi /etc/fdfs/client.conf
//修改如下配置项
# Client 的数据和日志目录
base_path = /data/fastdfs/client
# Tracker服务器地址及监听端口
tracker_server = 192.168.168.102:22122
# Tracker服务的HTTP端口,必须和tracker的设置对应起来
http.tracker_server_port = 8180
注:上述配置项的修改仅供参考,实际环境中请根据需求修改调整。
五、安装Nginx及模块
注:nginx需要和storage在同一个节点。
1.下载软件包
cd /data/tools
wget http://nginx.org/download/nginx-1.20.0.tar.gz
wget -O fastdfs-nginx-module-1.22.tar.gz https://github.com/happyfish100/fastdfs-nginx-module/archive/V1.22.tar.gz
2.安装fastdfs-nginx-module模块
mkdir -p /usr/local/nginx-mod
tar xf fastdfs-nginx-module-1.22.tar.gz
mv fastdfs-nginx-module-1.22 /usr/local/nginx-mod/
## 修改配置文件
/usr/local/nginx-mod/fastdfs-nginx-module-1.22/src/config,主要是修改路径,将配置文件中的 /usr/local/include 改为 /usr/include,因为fastdfs安装的时候没有修改路径,原路径是/usr。

3.复制并修改fastdfs-nginx-module中的配置文件
mkdir -p /data/fastdfs/tmp
//创建mod_fastdfs日志目录
cp /usr/local/nginx-mod/fastdfs-nginx-module-1.22/src/mod_fastdfs.conf /etc/fdfs/
vi /etc/fdfs/mod_fastdfs.conf
//修改如下配置项
# 连接超时时间
connect_timeout=10
# 日志目录
base_path=/data/fastdfs/tmp
# Tracker Server
tracker_server=192.168.168.102:22122
# StorageServer 端口,保持默认
storage_server_port=23000
# StorageServer 组名,需与storage.conf中的配置值一致
group_name=group1
# 如果文件ID的URL中需包含/group**,则要设置为true。默认值为false
url_have_group_name=false
# Storage 配置的store_path0路径,必须与storage.conf中的一致
store_path0=/data/fastdfs/storage
注:上述mod_fastdfs.conf配置项的修改仅供参考,实际环境中请根据需求修改调整。
4.安装Nginx
本文中不赘述Nginx编译安装过程,具体步骤请参照本人之前发布的文章《CentOS7下编译安装Nginx-v1.20.0》,URL地址为:
https://www.toutiao.com/i6961593096903705092/
注意:运行configure配置时添加fastdfs-nginx-module模块,命令如下:
./configure …… --add-module=/usr/local/nginx-mod/fastdfs-nginx-module-1.22/src
5.复制 FastDFS 的部分配置文件到/etc/fdfs 目录
cd /data/tools/fastdfs-6.07/conf/
cp http.conf mime.types /etc/fdfs/
6.配置Nginx
添加fastdfs虚拟主机配置文件
vi /usr/local/nginx/conf/vhost/fastdfs.conf
//添加如下配置内容
server {
    listen       8888;
    server_name  192.168.168.100;

    #location ~/group([0-9])/M00  {
    location ~/M00  {
        ngx_fastdfs_module;
    }

    error_page   500 502 503 504  /50x.html;

    location = /50x.html {
    root   html;
    }
}
注:Listen端口必须要与storage.conf中的http.server_port相同,防火墙需放开端口
7.启动Nginx
systemctl start nginx.service
8.检测NGINX配置文件会看到fastdfs模块信息
/usr/local/nginx/sbin/nginx -t
六、测试
1.服务器内使用命令上传
## 创建测试目录
mkdir -p /data/test
cd /data/test
//使用rz命令或通过其他方法从本地上传一张图片至该目录,测试使用
ll /data/test
## 使用命令上传图片至FastDFS存储
/usr/bin/fdfs_upload_file /etc/fdfs/client.conf fastdfs.jpeg
## 如上图所示,上传成功后返回文件路径及ID:
group1/M00/00/00/wKioZGCc3OqAMGRnAAEGHsKL6hw44.jpeg
## 浏览器访问
http://192.168.168.100:8888/M00/00/00/wKioZGCc3OqAMGRnAAEGHsKL6hw44.jpeg

2.服务器内使用命令下载
## 下载图片文件并重命名为test.jpg
/usr/bin/fdfs_download_file /etc/fdfs/client.conf group1/M00/00/00/wKioZGCc3OqAMGRnAAEGHsKL6hw44.jpeg test.jpg
3.服务器内使用命令删除
/usr/bin/fdfs_delete_file /etc/fdfs/client.conf group1/M00/00/00/wKioZGCc3OqAMGRnAAEGHsKL6hw44.jpeg
## 执行删除命令后,再次下载会报错
/usr/bin/fdfs_download_file /etc/fdfs/client.conf group1/M00/00/00/wKioZGCc3OqAMGRnAAEGHsKL6hw44.jpeg test1.jpg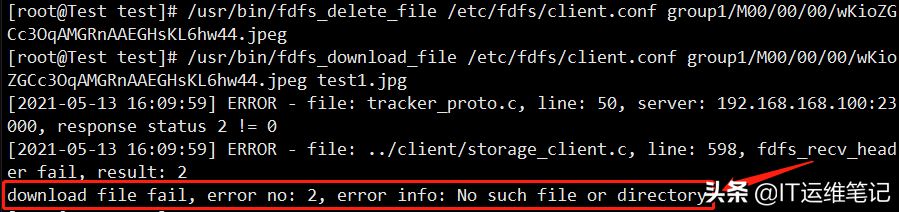
七、配置外部访问的Nginx
在另一台服务器(192.168.168.103)上配置Nginx访问(负载均衡及反向代理),隐藏FastDFS真实服务器。
## 编辑Nginx主配置文件nginx.conf,在http配置项中添加upstream项
vi /usr/local/nginx/conf/nginx.conf
//在http配置项中添加upstream项
upstream fastdfs_srv {
        server 192.168.168.100:8888;
    }
## 新建访问FastDFS相关虚拟主机配置文件,本文中为fastdfs.conf
vi /usr/local/nginx/conf/vhost/fastdfs.conf
//添加如下内容
server {
   listen       80;
   server_name  192.168.168.103;

   location /files {
       proxy_next_upstream http_502 http_504 error timeout invalid_header;
       proxy_pass http://fastdfs_srv/;
       expires 30d;
   }
}
## 重新加载配置
/usr/local/nginx/sbin/nginx -t
/usr/local/nginx/sbin/nginx -s reload
## 测试,使用浏览器访问
http://192.168.168.103/files/M00/00/00/wKioZGCc3OqAMGRnAAEGHsKL6hw44.jpeg