思科路由器子接口怎么设置(思科路由器2600如何连接)
一、思科路由器子接口怎么设置
无法直接设置,需要使用到代码。
S1:
开关>使能
开关#vlan数据库
交换机(vlan)30#vlan
交换机(vlan)#vlan40
开关#配置终端
交换机(配置)#intfastthernet0/1
交换机(config-if)30#切换端口访问vlan
开关(config-if)#intf0/2
交换机(config-if)40#交换机端口访问vlan
开关(config-if)#0/24intf
交换机(config-if)#switchport模式中继
#switchporttrunk允许所有vlan
子接口的代码
RT1也:
路由器>启用
路由器#配置终端
路由器(配置)#intfastthernet0/0.1
路由器(配置-subif)#封装dot1q30
路由器(config-subif)#IP添加172.16.3.254255.255.255.0
路由器(config-subif)#0/0.2intf
路由器(配置-subif)#封装dot1q40
路由器(config-subif)#IP添加172.16.4.254255.255.255.0
路由器(config-subif)#0/0intf
路由器(配置-如果)#没有关机
扩展资料:
Cisco路由器常用命令:
路由器>启用进入特权模式
路由器#配置终端进入全局配置模式
路由器(配置)#hostname设置交换机的主机名
路由器(配置)#enablesecretXXX设置特权加密密码
设置有特权的非秘密密码
路由器(配置)#行控制台0进入控制台端口
路由器(config-line)#linevty0.4进入虚拟终端
路由器(config-line)#登录需要密码验证
设置登录密码xx
路由器(config)#(Ctrl+z)返回特权模式
路由器#退出返回命令
二、思科路由器2600如何连接
连接计算机和路由器,以及路由器和外网接口,应注意级联线和直通线的用法。
首先确定f0/0与f0/1哪个是外网接口 哪个是内网接口
基本路由器配置命令
1.配置f0/0和f0/1的ip地址
Router>en 进入
Password: 输入密码 输入后看不见
Router#config t 进入特权配置模式
Enter configuration commands, one per line. End with CNTL/Z.
Router(config)#interface f0/0 进入f0/0接口
Router(config-if)#no shut 激活f0/0接口
Router(config-if)#ip address 172.16.0.246 255.255.255.0 配置IP地址
Router(config-if)#exit 退出
Router(config)#interface f0/1 进入f0/1接口
Router(config-if)#ip address 192.168.0.1 255.255.255.0 配置IP地址
Router(config-if)#no shut 激活f0/1接口
Router(config-if)#exit 退出
Router(config)#exit 退出
Router#
00:58:42: %SYS-5-CONFIG_I: Configured from console by console
Router#show run 查看运行状态
Building configuration...
==========================================================================
Current configuration : 850 bytes
!
version 12.2
service timestamps debug uptime
service timestamps log uptime
no service password-encryption
!
hostname Router
!
logging console notifications
enable password cheng
!
ip subnet-zero
!
!
!
ip inspect audit-trail
ip audit notify log
ip audit po max-events 100
!
!
!
!
interface FastEthernet0/0 --------------------------------------
ip address 172.16.0.246 255.255.255.0
duplex auto
speed auto
!
interface FastEthernet0/1
ip address 192.168.0.1 255.255.255.0
duplex auto
speed auto
!
interface Ethernet1/0
no ip address 注意每次查看的这些不同之处
ip broadcast-address 0.0.0.0
shutdown
half-duplex
!
ip classless
ip http server
ip pim bidir-enable
!
logging facility local3
logging 172.18.1.3
tacacs-server host 172.18.1.2
!
line con 0
line aux 0
line vty 0 4
login
! -------------------------------------
end
========================================================
---------------------------------------------------------------------------------------------------------------
2,配置路由和配置NAT内外接口(此包含了NAT转换的一些内容)
Router# 输入的en和密码就省去了 ~_~
Router#config t
Enter configuration commands, one per line. End with CNTL/Z.
Router(config)#ip route 0.0.0.0 0.0.0.0 172.16.0.254 配置路由信息 (此是一条缺省路由)
Router(config)#interface f0/0 进入F0/0接口
Router(config-if)#ip nat inside 把F0/0设置为接入口(inside)
Router(config-if)#exit
Router(config)#interface f0/1 进入F0/1接口
Router(config-if)#ip nat outside 把F0/1设置为接出口
Router(config-if)#exit
Router(config)#exit
Router#sho -----------------你一定?呵呵这里你只要输入show run 不用管他 只要不输错 就会成功
01:21:25: %SYS-5-CONFIG_I: Configured from console by consolew run
Building configuration...
---------------------------------------------------------
Current configuration : 797 bytes
!
version 12.2
service timestamps debug uptime
service timestamps log uptime
no service password-encryption
!
hostname Router
!
logging console notifications
enable password cheng
!
ip subnet-zero
!
!
!
ip inspect audit-trail
ip audit notify log
ip audit po max-events 100
!
!
!
interface FastEthernet0/0 --------------------------------------
ip address 172.16.0.246 255.255.255.0
ip nat inside ------->注意~0~ 这里
duplex auto
speed auto
!
interface FastEthernet0/1
ip address 192.168.0.1 255.255.255.0
ip nat outside ------->注意~0~ 这里
duplex auto
speed auto
!
interface Ethernet1/0
no ip address
ip broadcast-address 0.0.0.0
shutdown
half-duplex
!
ip classless
ip route 0.0.0.0 0.0.0.0 172.16.0.254 ------->注意 这里是缺省路由
ip http server
ip pim bidir-enable
!
!
logging facility local3
logging 172.18.1.3
tacacs-server host 172.18.1.2
!
line con 0
line aux 0
line vty 0 4
login
! -------------------------------------------
end
========================================================
3,配置NAT 转换的重要一句静态路由:
ip route-static
Router# 输入的en和密码就省去了 ~_~
Router#config t
Enter configuration commands, one per line. End with CNTL/Z.
Router(config)#ip nat inside source static 192.168.1.2 172.16.0.246 配置NAT地址的转换信息
Router(config)#exit
Router#show run 查看
01:21:25: %SYS-5-CONFIG_I: Configured from console by console
Building configuration...
---------------------------------------------------------
Current configuration : 797 bytes
!
version 12.2
service timestamps debug uptime
service timestamps log uptime
no service password-encryption
!
hostname Router
!
logging console notifications
enable password cheng
!
ip subnet-zero
!
!
!
ip inspect audit-trail
ip audit notify log
ip audit po max-events 100
!
!
!
interface FastEthernet0/0
ip address 172.16.0.246 255.255.255.0
ip nat outside
duplex auto
speed auto
!
interface FastEthernet0/1
ip address 192.168.0.1 255.255.255.0
ip nat inside
duplex auto
speed auto
!
interface Ethernet1/0
no ip address
ip broadcast-address 0.0.0.0
shutdown
half-duplex
!
ip nat inside source static 192.168.1.2 172.16.0.246 ------------>配好了
ip classless
ip route 0.0.0.0 0.0.0.0 172.16.0.254
ip http server
ip pim bidir-enable
!
logging facility local3
logging 172.18.1.3
tacacs-server host 172.18.1.2
!
line con 0
line aux 0
line vty 0 4
login
!
end
三、3个思科路由器怎么连接
3个思科路由器连接方法:设置2级路由。
【路由器1设置拨号】
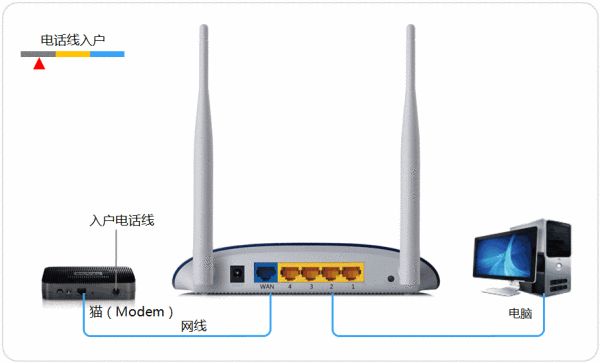
【家庭网络环境布线】:
1、有猫(modem):猫(modem)----路由器wan口;路由器lan口----电脑。
2、没有猫(modem):网线----路由器wan口;路由器lan口----电脑。
【电脑进入路由器】:
1、电脑ip、dns设置自动获取。
2、打开浏览器,在地址栏输入192.168.1.1(一般路由器地址是这个或者查看路由器背面的登录信息)进路由-输入用户名,密码 ,(默认一般是admin)。
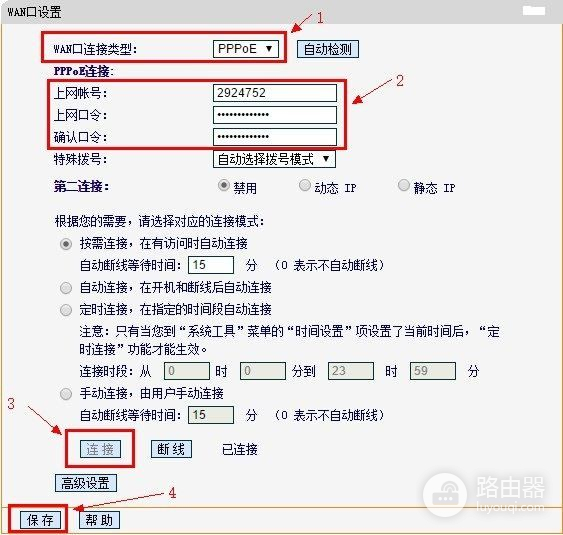
【设置路由器拨号】:
1、在【设置向导】里,选择【PPPoE拨号】(有些是ADSL拨号)这一项,按提示步骤输入上网的用户名和密码,保存。
2、在【网络参数】--【WAN设置】里,选【正常模式】,在【连接】的三个选项,选择【PPPoE拨号】这一项。
下面就是选择【自动连接】,保存,退出。
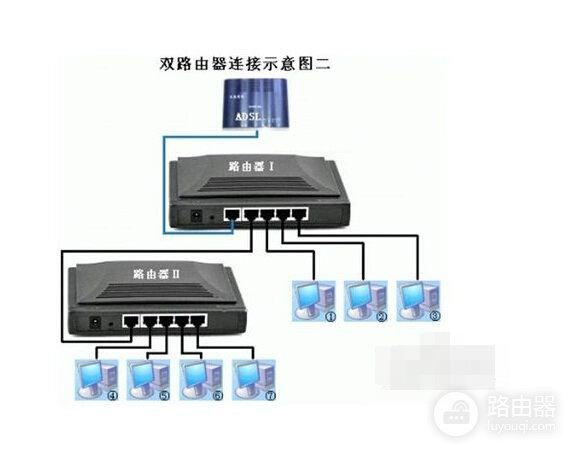
【路由器2和路由器1设置】:设置2级路由。
一、两台路由器连接方法
1、有猫(modem):猫(modem)----路由器1wan口;路由器1lan口----路由器2wan口;路由器2lan口----电脑。
2、没有猫(modem):网线----路由器1wan口;路由器1lan口----路由器2wan口;路由器2lan口----电脑。
二、设置方法
设置前,请断开第2路由器wan口网线,等设置完成后在插上。
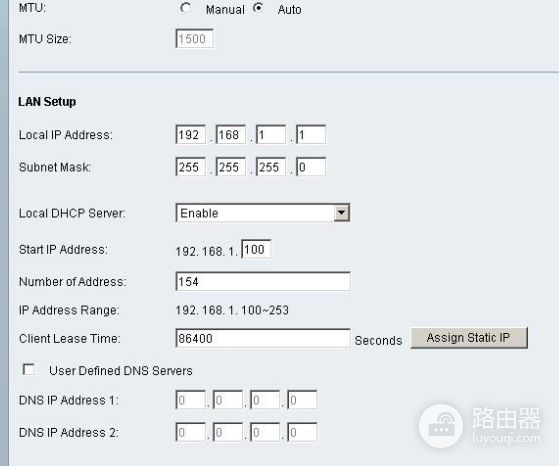
1、设置第2台路由器ip段。
①、lan口设置,如果你有多个路由器,而且是第2台路由器,为了避免冲突(路由器1lan口IP:192.168.1.1),可以将此IP改为其它。
比如修改为:192.168.2.1
在重启路由器,进入路由器的地址是:192.168.2.1了。
2、设置第二台路由器上网方法。
①、查看第1台路由器下连接的电脑的ip详细信息。
(win+r--输入,cmd--输入:ipconfig /all [记住:ip,掩码,网关,dns])
②、在第2台路由器上设置,在【设置向导】选择【静态ip】。
输入第1台路由器不用的ip,其他的:掩码,网关,dns设置一样。
③、设置好后重启路由器。
3、重启路由器后,设置已完成,重新接回路由器2WAN口的线,即可使路由器2正常联网。
【路由器3和路由器2设置】:设置2级路由,方法同【路由器2和路由器1设置】。


